This is a lengthy post, but I’m trying to be as comprehensive as I can be, with the design that I used.
It’s hard to give a firm answer as to how much it cost, simply because we didn’t keep every receipt. Some things that we ordered online I have receipts for, but receipts from Home Depot got lost. I’ll do my best to explain what we’ve paid, and some of the mistakes we’ve made along the way that might help you avoid unnecessary costs. I’ve also looked up some current prices (as of 8/25) for lumber and such. If you purchase lumber you know the prices have fluctuated a lot in the last few years.
Also, since we live in middle Georgia, our winters are pretty mild. We only get a handful of days each year below freezing, but it gets scorching hot in the summer. I did not want any solid walls on my hutch at all, so that we could get max airflow. Be sure to consider your own climate if you’re considering a design like mine.
Cages
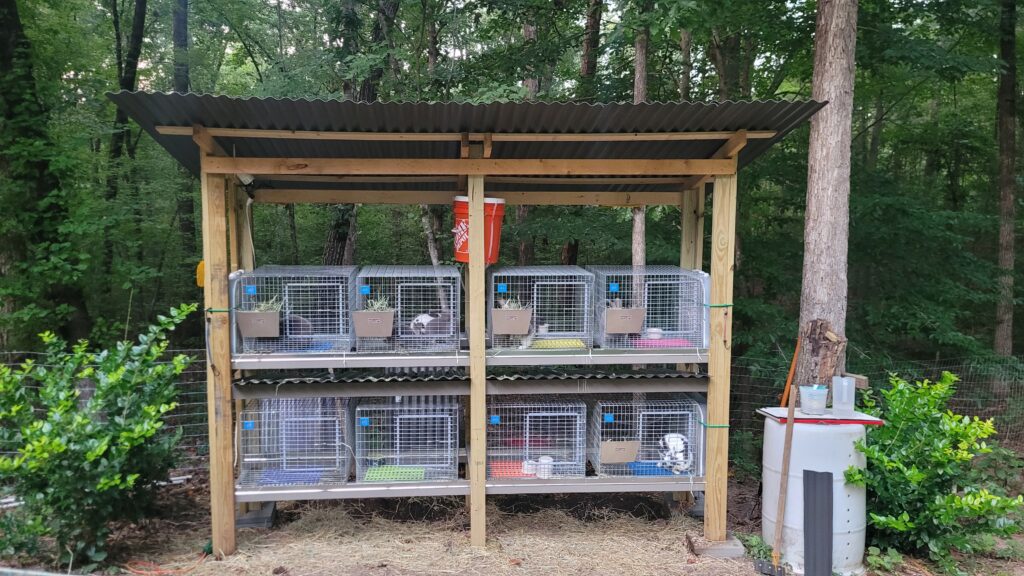
As I explained in my previous post, we knew we would be in this for a while, so we were willing to pay for quality when it came to cages. My first order from KW was for 3 cages, for 2 does and a buck. We decided on 24”x24”x18”. This would fit my hutch design. We paid the extra for thicker gauge wire bottoms on all 3, and we upgraded 2 of them to baby saver cages. I also ordered 3 hay racks, 3 resting pads, and 2 nesting boxes. The total with shipping was $400. About $100 of that was shipping from California to Georgia. This would be enough to get our animals into better, and more manageable cages, while I ironed out the final design of my hutch.
My second order, after I got the hutch details figured out, was only a month later. I got 5 more cages to fill up the hutch (for a total of 8 cages). This time all were baby savers, with the upgraded bottoms. I also got 5 more mats, and 5 more hay racks, and 6 stoneware crocks (food bowls) and the total, with shipping was $535 (shipping this time was only $75).
If you’re asking why I didn’t simply order everything at once to maybe save on some shipping, I didn’t want to commit to that many cages, then find out that there was some flaw in the cages, or in my plan. We wanted to make sure our cages would fit my hutch design, then if we liked the cages, we would order the remaining 5. Once we got the first 3, we quickly decided that KW was definitely the brand we wanted.
Our total for 8 cages was $935
Hutch
As for the hutch, after much looking and studying, we decided on a modified version of a hutch that we saw on Teal Stone Homesteads YouTube channel. I posted a link to her build in a previous blog post. She did a fantastic job of designing her hutch, but we made a few modifications to make construction easier, and to to suit our own specific needs.
A large portion of the cost of my build was in the roofing material. I spent extra to get a polycarbonate roofing material rather than plastic or metal. My hutch is in the sun, and a metal roof does nothing to cut down on the amount of heat passing through. Plastic is no better at stopping the heat, plus it is more brittle. You can touch the bottom side of the polycarbonate with your bare hand, and it’s only warm, no where near as hot as metal. Also, you can cut it with a fine tooth saw blade and a regular skill saw. These cost about $23 each, and I used 3 on my first hutch. They come in 8′ sheets, and I cut them in half to 4′. I originally used clear corrugated plastic for the “poop chute” that sits between the top and bottom rows. This is what keeps the droppings from the top row from dropping on to the bottom row of cages. The clear corrugated plastic was a little cheaper, and I was able to cut it in 2′ lengths. This was a waste of time and money. See my mistakes below. We ended up replacing the clear plastic corrugated material with the same polycarbonate roofing material that we used for the roof.
After the roofing, we had:
- 8 – 10′ Non Pressure Treated 2×4 (around $50)
- 10 – 8′ Pressure Treated 2×4 (around $50
- 6 – 8′ Non Pressure Treated 2×4 (around $18)
- 8 – 10′ Galvanized Drip Edge (around $50)
- Pavers (about $2 each, you’ll need enough for each leg, plus any leveling)
- Screws, roofing screws, liquid nail
So, all total, we had around $350 in roofing, lumber and hardware.
Water
Our water system is made up of 5 gallon buckets, automatic nipples, tubing and brass tee’s. Orange Homer buckets cost about $5 each (less if you buy in bulk). A 30 pack of nipples cost $14. 50′ of 5/16 ID silicone tubing is $23. 5/16 brass tee’s are $14 for a box of 10. That’s $50 for everything you need, with extra tubing and nipples to make future repairs. We add a second nipple to our cages when we have kits. The only thing missing is lids for the buckets. A regular lid is only $2, but you’ll have to cut a hole in the top to be able to fill the buckets. I’m not sure where I had some clean paint lids from, but I cannot find them for sale anywhere now. These are the types of lids that come on 5 gallon buckets of paint, with the spout that pulls out, and a screw on cap. The spout is just big enough for a garden hose to fit inside of, and I can put the cap back on to keep bugs out. I do have a couple of buckets with flat lids, and I just had to cut a hole in the top that stays open all the time.
Our water system cost about $50ish.
Extras
We designed our hutch to hold standard box fans on either end. We have 4 total, 2 on top and 2 on bottom.
We also have a Yolink system already in our home. This is a home automation system, with sensors for doors, windows, water leaks, and lots of other things. I purchased a temp sensor and an outdoor power switch for the hutch. I programmed it to turn the fans on at 75, and off at 73. This is absolutely not necessary, but I’m a bit of a nerd, and I think its neat. We can also turn them on and off from our phones. I’m thinking of adding an available water level sensor to my buckets to let me know when their water gets low.
Mistakes & Improvements
When I built my second hutch, I made a few improvements. The first was the roof. Instead of cutting down the roofing panels, I just put the 8′ panels up. It took 6 of them for the roof, plus another 3 for the poop chute. The polycarbonate panels are tough and rigid. I like the extra roof length so that we don’t get rained on when we are feeding our rabbits, plus it provides a bit more shade.
My first plan for the chute between the 2 rows was to use a cheaper, clear plastic. They were 8′ long panels, and I cut them in 2′ lengths. The way I put them up was to suspend the front edge with zip ties, and allow the rear to simply sit on top of the cage underneath. The problem was that they BARELY hung past the cage. I flaked out and just didn’t think about the length until after I had cut it and was assembling it. Also, the plastic didn’t cut well with my fine tooth saw blade. It cracks and splinters everywhere, and leaves rough edges. I eventually added another support on the front and back (with some slope to allow some run off) and replaced the clear plastic with the same polycarbonate roofing that I used. This stuff is super tough, and pretty slick, which makes for easier cleaning. We were breaking the plastic panels just cleaning them. I also made the panels longer, so that I can park my wheel barrow below the edge of the panels, and just rake the droppings directly off.
I mentioned in a previous post that the red tee’s that come with the nipples are garbage. They’re absolute junk. Do yourself a favor and start with brass tee’s.
I incorporated a level into the side of each bucket to make it easy to see how much water is left inside the bucket. Again, I wasn’t thinking, and did this on both buckets, even though I have them plumbed together. Since they’re plumbed together, I really only need one, since the water will level out in both buckets. Although I’m not concerned with a leak, this does technically make a possible leak point, and if you’re using brass tee’s, they’re too expensive to waste unnecessarily. Just use 1 if you have all of your buckets on the same system.
Final Thoughts
Your costs may be different than mine. My grand total (est.) for an 8 cage hutch was around $1350, not counting the cost of animals. This sounds like a lot, and it is, but I am absolutely confident that everything here, with a little maintenance, will last a very long time. We are in year 3 now, and the only thing I’ve had to replace was a handful of the cheap nipples. So far, my roof, my structure, my cages are all still in great condition, with little or no wear and tear so far.
Lumber costs are different for different regions, and shipping may be more or less, depending on where you live. Also, the prices above are a mix of 2023 prices (for the stuff I had receipts for) and 2025 prices (lumber and other things I looked up on websites), so if you’re reading this in the future, who knows how much the real cost may be. Owning a couple of small businesses ourselves means we prefer to shop at small businesses when we can. If you have a local cage manufacturer, or lumber yard, we encourage you to purchase from them if you can. For us, at the time that we were making our purchases, Home Depot, Amazon, and KW Cages was our best option. You can save shipping from KW if you are able to pick up your cages at any of the shows they also attend. You’ll have to check their website for that information.
Feel free to comment on this post, or contact us if you have any questions. I plan to post blue prints in the near future for my hutch.